1. Introduction: Why Choose Shopify for Your eCommerce Store
When starting an eCommerce business, choosing the right platform is crucial. Shopify is one of the most popular and beginner-friendly platforms for creating an online store. With over 1.7 million businesses using Shopify worldwide, it offers everything you need to set up, run, and scale your store. Whether you’re launching a small boutique or a large-scale enterprise, Shopify’s flexible tools, easy integration options, and vast support network make it an ideal choice.
In this Shopify tutorial for beginners, we’ll walk you through the step-by-step guide to set up a Shopify store in 2024. Follow these detailed instructions to get your online store running quickly.
Table of Contents
2. How to Sign Up for Shopify
The first step to setting up your store is signing up for a Shopify account. Shopify offers a 14-day free trial to get started, so you can test out the platform without any upfront cost.
Step-by-Step Instructions:
- Go to Shopify’s Website: Navigate to shopify.com and click on the “Start Free Trial” button.
- Enter Your Email Address: Input your email and click “Start free trial.”
- Create Your Shopify Account: Choose a secure password and enter your store name. Don’t worry too much about the name right now — you can change it later if needed.
- Fill in the Necessary Details: Shopify will ask you for some basic information about your business. Enter these details, and you’re good to go.
Once you’ve signed up, you’ll enter your new store’s dashboard, where the Shopify setup process begins.

3. Setting Up Your Shopify Store Settings
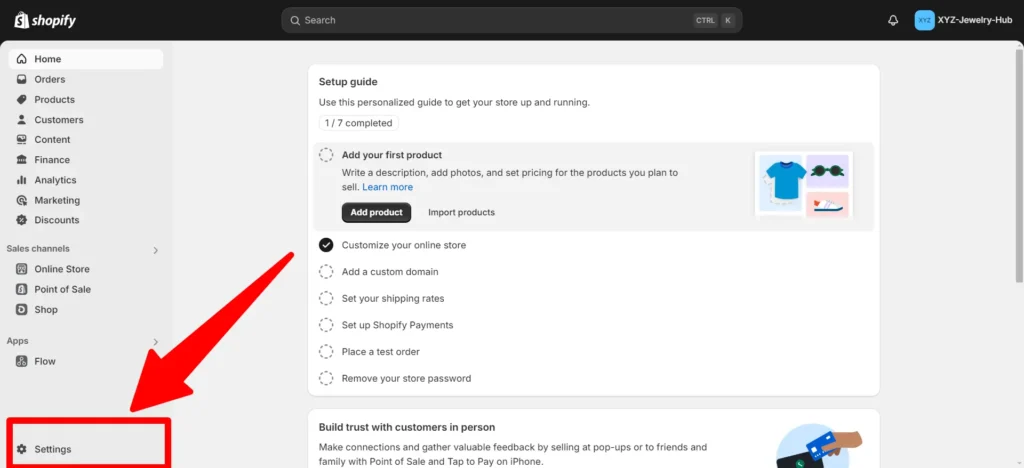
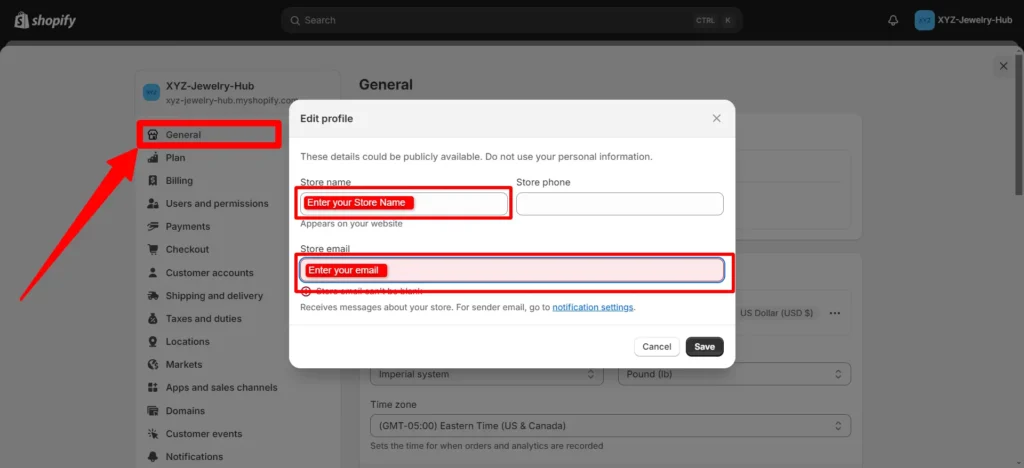
With your Shopify account created, it’s time to configure the foundational settings for your store.
Basic Settings to Configure:
- Store Name and Address: Navigate to Settings > General and fill in your store name, contact details, and business address.
- Currency Settings: Select your store’s currency based on where you’ll be selling. You can find this in Settings > Store Currency.
- Time Zone & Language: Set your preferred time zone and language to ensure everything is aligned for your market.
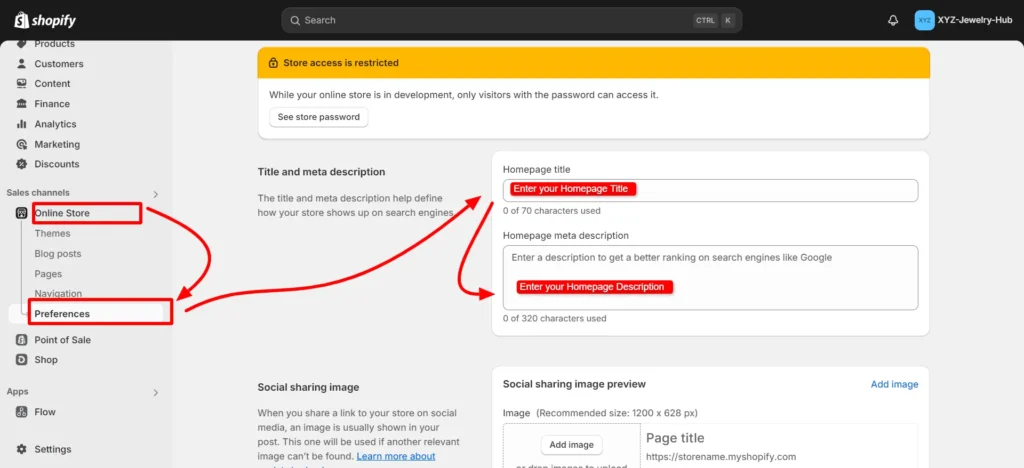
- Store Preferences: Head to Online Store > Preferences to add your store’s meta title and meta description. These are crucial for Shopify SEO and will help you rank better on Google.
4. Choosing the Right Shopify Theme
A good theme is essential to creating a visually appealing store. Shopify offers a wide variety of free and paid themes that are tailored to different industries and product types.
Steps to Choose and Install a Theme:
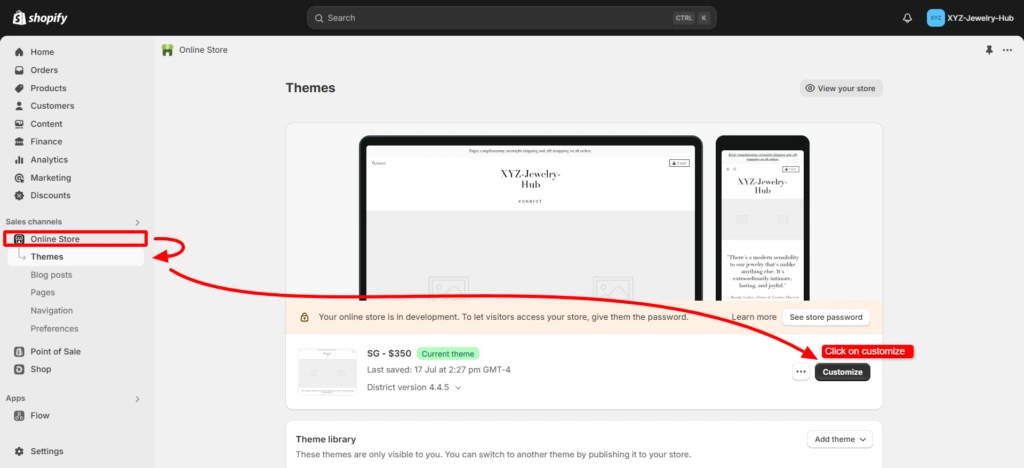
- Go to the Shopify Theme Store: On your dashboard, go to Online Store > Themes. Browse through the available themes, filtering by industry or layout type.
- Preview and Select a Theme: Once you find a theme you like, preview it to see how it looks on your site. When you’re ready, click “Install” to apply it to your store.
- Customize Your Theme: After selecting your theme, go to Online Store > Themes > Customize. Here, you can change colors, fonts, layout, and more to align with your brand.
Pro Tip: If you’re looking for a more professional look, consider a paid theme from the Shopify Theme Store, as they often come with better customization options and support.
5. Adding Products to Your Shopify Store
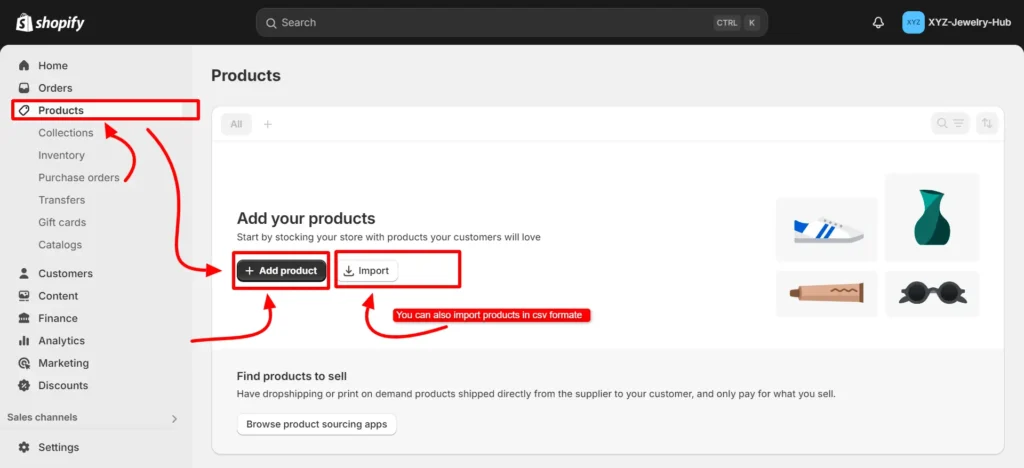
Now it’s time to add your products. Well-organized product listings can make or break your store’s success.
Step-by-Step Product Setup:
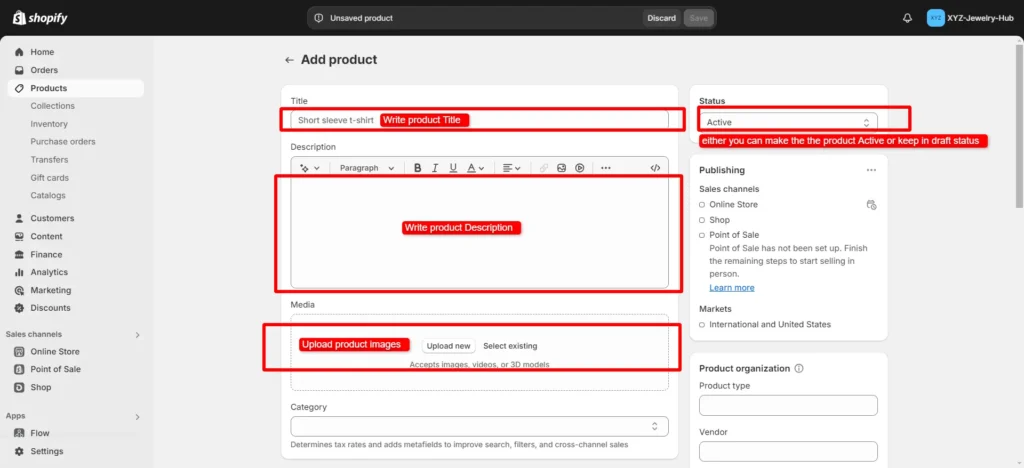
- Navigate to Products: On your dashboard, click on Products > Add product.
- Create Product Listings:
- Product Title: Make sure the product title is clear and includes primary keywords.
- Description: Write a detailed, SEO-optimized product description that highlights the key benefits and features of your product.
- Product Images: Upload high-quality images of your product. Use multiple angles to give shoppers a clear view.
- Pricing and Inventory: Set the price, track inventory, and manage stock levels.
- Add Variants: If your product comes in different colors, sizes, or models, you can add these as product variants. This makes managing inventory easier.
- Product Organization: Add tags and place products into appropriate collections (categories) to ensure your store remains well-organized.
6. Configuring Payments and Shipping
One of the key steps in setting up your Shopify store is to configure payment gateways and shipping options.
How to Set Up Payments:
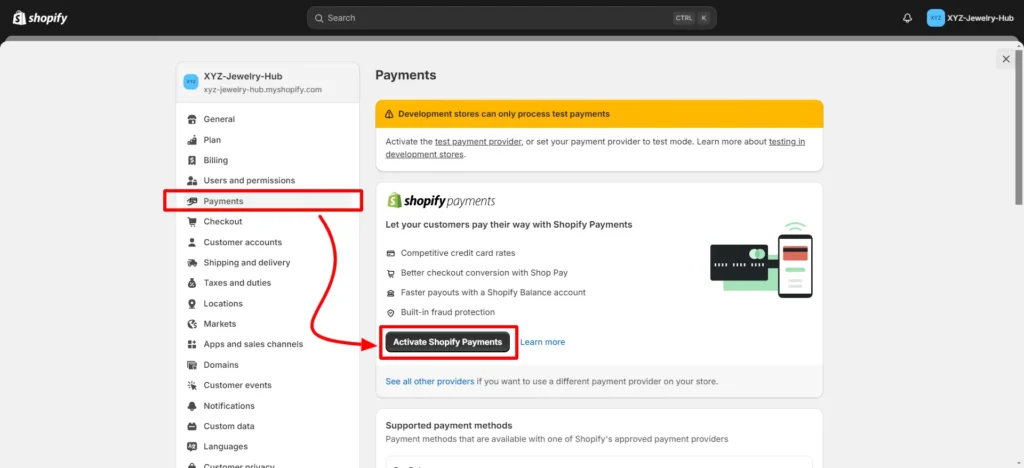
- Go to Settings > Payments.
- Activate Shopify Payments: Shopify Payments is the platform’s built-in payment gateway that supports major credit cards and various other methods like Apple Pay and Google Pay.
- Add PayPal: Shopify integrates seamlessly with PayPal, making it easy to set up. Click on Activate PayPal Express Checkout.
- Other Payment Gateways: If Shopify Payments isn’t available in your country, you can choose from over 100 third-party payment gateways.

How to Set Up Shipping:
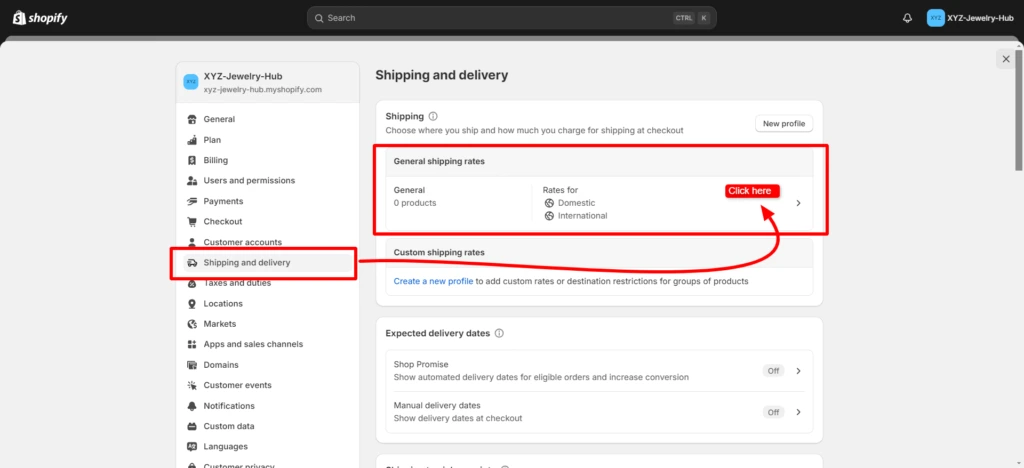
- Go to Settings > Shipping and Delivery.
- Create Shipping Zones: Define different shipping rates based on regions.
- Carrier Calculated Rates: Integrate with shipping carriers like USPS, DHL, or UPS to provide real-time shipping rates.
Ensure you offer clear and affordable shipping options to improve conversion rates.
7. Customizing Your Shopify Store Design
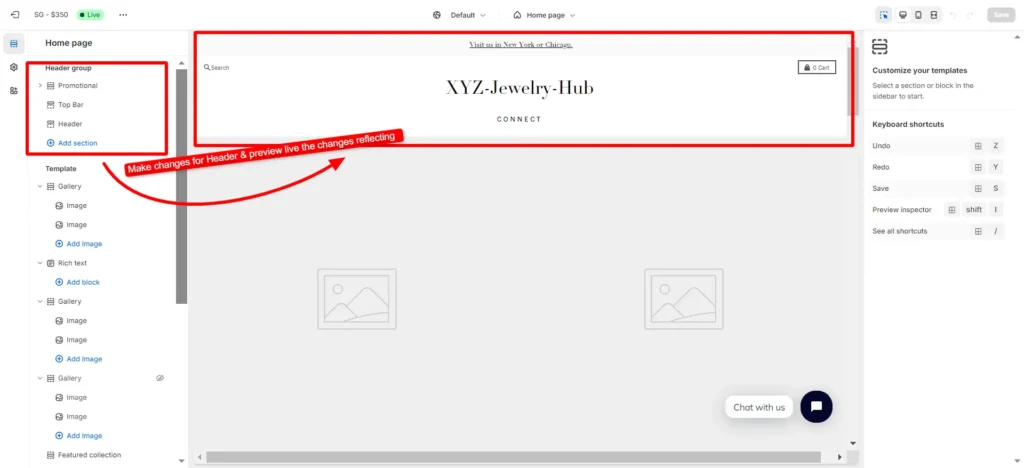
Once the structure of your store is in place, it’s time to give it a unique look. Shopify’s drag-and-drop editor makes it simple to modify the layout, fonts, and colors.
Customization Tips:
- Header and Footer Customization: Add your logo, navigation links, and social media profiles in the header and footer sections.
- Homepage Customization: Create an engaging homepage by adding featured products, banners, and call-to-action buttons.
- Colors and Typography: Customize your store’s look to match your brand by adjusting the color scheme and typography.
- Add Custom Pages: Use Online Store > Pages to create important pages like About Us, Contact, and FAQ.
A well-designed store will leave a lasting impression on visitors, making them more likely to purchase.
8. Testing and Launching Your Shopify Store
Before going live, it’s crucial to test your store to ensure everything works as expected.
Final Pre-Launch Checklist:
- Place a Test Order: Shopify allows you to place test orders to ensure the checkout process works smoothly. Go to Settings > Payments and activate Test Mode.
- Check for Mobile Responsiveness: Ensure that your Shopify store looks good on mobile devices, as over half of eCommerce traffic comes from mobile.
- SEO Review: Double-check that your pages have proper SEO titles, descriptions, and keywords.
- Disable Password Protection: When you’re ready to go live, remove the password protection from your store in Online Store > Preferences.
Launch Your Shopify Store:
Once you’re confident everything is set up, it’s time to officially launch your Shopify store! Share your store link on social media, announce it to your email list, and start driving traffic.
9. Conclusion: Final Shopify Setup Tips for 2024
Congratulations! You now know how to set up your Shopify store from scratch. By following this Shopify step-by-step guide, you’ll be well on your way to launching a successful eCommerce business in 2024.
Remember, building an online store is just the beginning. Keep optimizing your store, updating your product listings, and experimenting with new marketing strategies to grow your Shopify store.